
DNS Leak: How Your Data Leaks Online and How to Prevent It – A One-Minute Check!

Evgeny Fomenko2025-01-30
Each time you enter a website address in your browser, a complex system translates your request into a numeric address that computers understand. DNS is an essential part of this process, yet many users don’t realize this is where one of the threats to their privacy lies. Questions about DNS leaks fill forums and chat rooms, as this issue can undermine our efforts to protect our data. Below, we'll look into what DNS leaks are, how they can compromise your security and anonymity, and, most importantly, how to prevent them.
Need private and fast mobile proxies?Make mobile proxies right now!
What is DNS and How Does It Work?
DNS (Domain Name System) is a system that helps your computer to locate the sites you want to visit on the internet. When you type a site name (for example, "google.com"), DNS converts it into a numerical IP address that computers use for communication. Your request isn’t sent directly to the Google site; instead, it first contacts a DNS server that identifies the site’s location by returning its IP address. This DNS process serves as the internet's "phone book," directing your device on where to send the request. Notably, all data about your requests is accessible to the DNS server owner and your internet service provider, which can de-anonymize you, determine your location, and use the data about you for their purposes.
What is a DNS Leak?
When you use a proxy or VPN, you expect that all your internet activity will be anonymous (with a proxy) and additionally encrypted (with a VPN). Proxies and VPNs typically accomplish these tasks, particularly when directing your request to the target site. However, sometimes, the DNS request can travel through a non-anonymous and unencrypted path, as if no proxy or VPN were used at all. This creates ‘traces’ during the DNS request, leading to data leakage about your internet activity. If detected, these traces may result in your traffic being flagged as suspicious and potentially blocked.
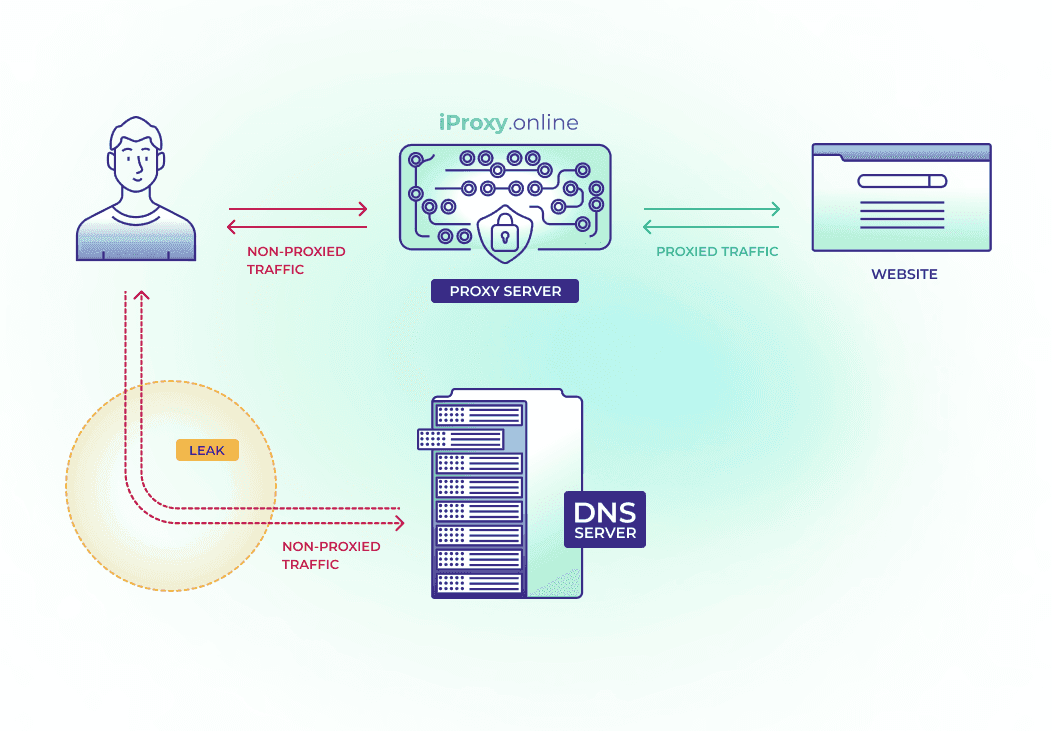
A DNS leak occurs when your DNS requests (which should be sent on behalf of the proxy or VPN server) are instead routed through your regular DNS server, usually your ISP's server. This privacy breach allows the provider to see which sites you visit. Additionally, using your provider's DNS server can raise suspicions from the target site. Here are some primary causes of DNS leaks:
-
Incorrect proxy or VPN setup: If the proxy or VPN is not correctly configured, it may not intercept DNS requests that are by default sent through the ISP.
-
Using public Wi-Fi or a vulnerable router: In public networks, attackers can eavesdrop on DNS requests, making your internet activity vulnerable. If a VPN is used with the right settings, this can help protect your data. However, in some cases, DNS requests may still be redirected to fake DNS servers, posing an additional threat. This can result in being directed to fake sites instead of legitimate ones, which can be used for identity theft or malware distribution.
-
Outdated or unstable VPN clients and proxies: Some older or improperly configured VPN clients and proxies may not direct DNS requests through an encrypted channel. For example, some VPNs and proxies do not support the new IP address standard—IPv6. Previously, 32-bit IPv4 addresses were used (e.g., 192.168.0.1), but due to the limited number of these addresses, the IPv6 standard was created, which uses 128-bit addresses and allows more devices to connect. The internet is still transitioning to this standard. When this happens, your DNS requests may bypass the secure VPN or proxy connection, risking data leaks, as requests are sent through the regular internet without protection.
-
Using transparent DNS proxies: In some cases, applications or devices can ignore VPN and proxy settings, sending DNS requests directly through the provider, bypassing the VPN or proxy-secured channel.
-
Software settings: For instance, Windows has a feature called Smart Multi-Homed Name Resolution (SMHNR), which sends DNS requests to all available servers and uses the one that responds first, which may lead to DNS leaks. Additionally, the built-in Teredo function in Windows may bypass VPN and proxy protection, as it is a tunnel protocol for working with both IPv4 and IPv6, which may take precedence over encrypted traffic.
-
Internet provider’s choice of DNS server: Some providers may set up their own DNS servers, while others may use the DNS servers of parent companies or third-party providers, making it harder to track the route of DNS requests. This creates additional risks, as users may not always know which server their DNS requests are passing through. For example, if a user uses a VPN or proxy, but DNS requests are routed through the provider's standard servers, this may lead to data leaks since the provider will receive information about the sites visited.
-
DNS leaks and EDNS Client Subnet: Modern DNS clients often use the EDNS Client Subnet extension, which adds your subnet information to DNS requests. This is done to optimize routing and provide content from nearby servers. However, this also means that your actual IP address or part of it may be exposed to third parties, even if you are using a VPN. Even if EDNS Client Subnet is not used, the DNS server itself can identify your IP address by the request’s source. Typically, this request comes from your internet provider's DNS resolver, whose settings may be specified on your router.
-
Geo-DNS: Many large services, like Instagram, use Geo-DNS to direct users to servers nearest to them. When the DNS server receives your request, it determines your location based on your IP address and provides the IP address of a server optimized for your region.
For instance, if you are in Moscow, the Instagram DNS server will give you the IP address of a Russian server. However, when you use a VPN, your HTTP traffic goes through a different IP address, for example, a German one. This creates a discrepancy: the DNS request indicates you are in Russia, while the HTTP request shows you are in Germany.
Need private and fast mobile proxies?Make mobile proxies right now!
Why Are DNS Leaks Dangerous?
The various consequences of DNS leaks can significantly impact your internet privacy and security. Here are the main consequences:
-
Disclosure of proxy or VPN usage: Websites and third-party services can match the user’s DNS requests with their traffic to the target site. If DNS requests go through a regular DNS server while the rest of the traffic is routed through a VPN, it creates a mismatch, which can indicate the use of traffic-masking tools. As a result, third-party services may notice that your traffic is trying to mask itself.
-
Content access issues: In countries with limited internet access, DNS leaks may allow providers or government agencies to block access to certain sites, even if you use technologies to bypass such restrictions, like VPNs. This limits your internet freedom and hinders access to necessary information.
-
Detection of the user’s location: If a DNS leak occurs while you are attempting to bypass geo-restrictions (for example, when viewing content only available in specific countries), it may reveal your actual location and block access to region-restricted content.
-
Violation of anonymity: With a DNS leak, the internet provider can see which sites you visit, even if your main traffic is encrypted. This means that your anonymity will be compromised, and your online activities can be tracked and analyzed.
-
Personalized advertising: Your DNS requests may be used to create a profile of your interests. Providers can sell this data to marketing companies, resulting in targeted ads based on your internet requests. This reduces your privacy and makes you more vulnerable to aggressive marketing campaigns.
How to Check Your Device for DNS Leaks?
Checking for DNS leaks is an essential step in protecting privacy, especially when using public networks or VPN services. There are numerous methods to detect DNS leaks on your device. Below are the main approaches:
Online Services for Checking DNS Leaks
This is the simplest way to see if you have a DNS leak. No software download is necessary; everything is done directly through your browser. Here’s how it works:
I. Visit one of the DNS leak testing sites:
- Whoer.net: A versatile tool that checks your IP address, DNS leaks, and the security of your connection. It helps detect if your browser is masked and provides detailed information about your connection, including location and VPN use. This service also offers WebRTC and DNS leak tests.
- BrowserLeaks.com: An online tool for checking browser privacy and security. The site offers various tests to detect IP, DNS, WebRTC, geolocation, and other leaks that could reveal information about the user. It helps assess privacy levels and provides recommendations for online security.
- DNSleak.com: A straightforward website that checks if your DNS requests leak through unsecured ISP servers. It quickly identifies any leaks and offers suggestions for fixing them.
- DNSleaktest.com: A DNS leak testing tool that helps identify which DNS servers are processing your requests and detects data leaks. The site offers a "quick test" and an "extended test" for more in-depth diagnostics.
- IPLeak.com: A service for testing IP, DNS, and WebRTC leaks. It allows users to check what data may be revealed during an internet session, even when using VPNs or proxies. The site also helps identify if plugins like WebRTC, Flash, or Java are revealing your information and provides tips for avoiding these leaks.
II. Run the test on the website. It checks which DNS servers are handling your internet requests.
III. After completing the test, you will see a list of DNS servers and their IP addresses.
Review the results:
If the list includes your regular internet provider’s DNS servers, your requests are bypassing the VPN, and the ISP can see your activities.
If the DNS server location matches the IP address location, the masking is working correctly, and your requests are going through the VPN or proxy without leaks.
Handling DNS server IP addresses:
-
If you’re unsure who owns the DNS server, you can copy its IP address.
-
Go to whois.com and paste the IP address to find out who owns the server and where it is located.
This way, you can understand through whom your DNS requests are passing and ensure your privacy is not compromised.
Important: When you use a VPN or proxy, your ISP cannot see which sites you visit (e.g., Instagram), and websites cannot determine your location, allowing you to bypass their restrictions. However, be very cautious: your entire internet activity fully depends on your proxy service. If it is unreliable or has an unclear policy, your personal data may be compromised. Choose only trusted and reliable services, as your privacy and security depend on this.
Need private and fast mobile proxies?Make mobile proxies right now!
How to Prevent DNS Leaks?
Ensure Your Proxy or VPN Provider Supports DNS Protection
After discovering a DNS leak, the first thing you should do is check if your proxy client or VPN has built-in DNS leak protection. Most reputable VPNs, like NordVPN, ExpressVPN, or ProtonVPN, as well as reliable proxy clients, include DNS leak protection in their services. If your provider lacks this feature, consider switching VPN providers.
iProxy.online service not only ensures fast and reliable proxy performance but also guarantees a high level of DNS leak protection. With iProxy.online, you gain both flexibility and internet freedom, along with the confidence that your data is secure. This is the ideal solution for those who prioritize privacy and want to avoid DNS leaks. Check out our FAQ on client privacy on this page.
Change DNS Servers Manually
If your proxy or VPN does not have built-in leak protection or if you’re not using a proxy or VPN at all, you can manually change DNS servers to more private and secure ones. For example, consider using DNS from services like Cloudflare (1.1.1.1) or Google (8.8.8.8). This reduces the likelihood of your ISP tracking DNS requests.
How to Change DNS Servers on Windows 11:
-
Click Start and select Settings (or press Win + I).
-
In the settings window, go to Network & Internet.
-
In the Network & Internet section, click on the Properties of your active network connection (e.g., “Ethernet” for wired, or “Wi-Fi” for wireless), and click the network name.
-
Find IP settings and click Edit (under the connection status).
-
In the Edit IP settings window, select Manual mode.
-
Enable IPv4 (or IPv6, if you need to configure DNS for IPv6 protocol).
-
Enter the DNS servers in the fields: Preferred DNS: Enter 1.1.1.1 (for Cloudflare DNS) or 8.8.8.8 (for Google DNS). Alternative DNS: Enter 1.0.0.1 (for Cloudflare) or 8.8.4.4 (for Google DNS).
-
Click Save to apply the changes.
How to Change DNS Servers on MacOS:
-
Open System Preferences and go to Network.
-
Select the active connection and click Advanced.
-
Go to the DNS tab and add the preferred DNS servers (e.g., 1.1.1.1).
How to Change DNS Servers on Android:
-
Open Settings on your Android device.
-
Go to Network & Internet (or Connections), select Wi-Fi, and tap on your connected network.
-
Choose Modify Network (or Edit Settings).
-
Enable Advanced options.
-
Under IP Settings, select Static.
-
Enter DNS servers: DNS 1: 1.1.1.1 (Cloudflare) or 8.8.8.8 (Google DNS). DNS 2: 1.0.0.1 (Cloudflare) or 8.8.4.4 (Google DNS).
-
Tap Save.
How to Change DNS Servers on iOS:
-
Open Settings on your iPhone or iPad.
-
Go to Wi-Fi.
-
Tap the i icon next to your connected Wi-Fi network.
-
Scroll down and select Configure DNS.
-
Choose Manual (the default is Automatic).
-
Tap Add Server and enter the DNS servers: 1.1.1.1 (Cloudflare) or 8.8.8.8 (Google DNS).
-
Tap Add Server again for the second server: 1.0.0.1 (Cloudflare) or 8.8.4.4 (Google DNS).
-
Remove any old DNS servers, if listed, and tap Save.
Similarly, your preferred DNS server option may be available in your proxy or VPN client. Read about the Enable OpenVPN DNS function on iProxy.online to manually configure DNS servers for your device.
Use Anti-Detection Browsers
Anti-detection browsers are powerful tools for complete internet anonymity. They not only mask your IP address with a proxy but also prevent potential DNS leaks, which could reveal your real location. Even when using proxy servers like SOCKS5 or HTTP, there are risks that DNS requests may be sent directly through the provider instead of the proxy, potentially compromising your anonymity. Anti-detection browsers are specifically designed to change and redirect DNS requests so they match the geographic location of the proxy server, effectively preventing DNS leaks and enhancing tracking protection.
The main task of an anti-detection browser is to modify browser "fingerprints" like timezone, user agent, screen size, and other parameters to prevent tracking, while the proxy is used to mask your IP address. Thus, the anti-detection browser and proxy work together, but the proxy is not built into the browser—it needs to be set up separately.
Configure the Firewall
Windows Firewall is a built-in security tool in the Windows operating system designed to filter incoming and outgoing network traffic based on defined security rules. It helps protect the computer from unauthorized access, blocks malicious programs, and can manage program access to the internet or local network.
Setting Up the Firewall on Windows 11:
-
Open Windows Defender Firewall with Advanced Security.
-
In the Outbound Rules menu, click New Rule.
-
Select Port, specify port 53 (DNS).
-
Choose Block the connection.
-
Apply the rule to all profiles (Domain, Private, Public).
-
Name the rule, for example, “Block DNS outside VPN.”
-
Exclude VPN DNS servers, if necessary.
Setting Up the Firewall on macOS:
- Open System Preferences → Network.
- In the active connection, click Advanced → DNS.
- Remove the current DNS and add Cloudflare (1.1.1.1 and 1.0.0.1) or Google DNS (8.8.8.8 and 8.8.4.4).
- Use a third-party firewall, such as Little Snitch, to block traffic through port 53 outside the VPN.
Use DNS over HTTPS (DoH)
DNS over HTTPS (DoH) is a protocol that allows DNS requests to be sent over an encrypted HTTPS connection. Usually, DNS requests are sent in plaintext, allowing providers and potential attackers to monitor which sites you visit. DoH encrypts these requests, sending them over the same protocol used to secure web traffic on the internet.
How It Works
-
Request Encryption: When you type a site address into your browser, instead of sending an unencrypted DNS request, your DoH client encrypts the request and sends it to the DNS server over HTTPS.
-
Processing on the Server: The DoH-supporting DNS server receives the request, decrypts it, and performs the standard DNS resolution.
-
Returning the Response: The resolution result is encrypted again and sent back to your client over HTTPS.
How to Set Up DoH:
In the Browser:
-
Mozilla Firefox: Go to Settings → General → Network Settings. Enable “Enable DNS over HTTPS” and select your preferred DoH provider.
-
Google Chrome: Enter chrome://settings/security in the address bar. Scroll down to Use secure DNS and enable it, selecting a provider.
At the OS Level
-
Windows 10 and above: Go to Settings → Network & Internet → Properties of your connection. In the DNS settings section, choose “Encrypted DNS (DNS over HTTPS).”
-
macOS and Linux: Use third-party applications or configure DoH manually through the terminal, following the relevant provider instructions.
Through the VPN Service:
- Many VPN services, including ours, automatically use DoH or DNS over TLS (DoT) to encrypt DNS requests. Ensure that your VPN settings include an option for “Secure DNS” or a similar feature.
Recommended DoH Providers:
-
Cloudflare: https://cloudflare-dns.com/dns-query
-
Google DNS: https://dns.google/dns-query
WebRTC Leaks:
WebRTC (Web Real-Time Communication) is a technology that enables web browsers and mobile applications to facilitate real-time audio and video communication and data exchange without third-party plugins. WebRTC is used in applications like Google Meet, Zoom, Discord, and other video chats and P2P networks. One of WebRTC’s key issues is that it can leak your IP address, even if you’re using a proxy or VPN. WebRTC uses the STUN (Session Traversal Utilities for NAT) protocol to establish a direct connection between devices. During this connection, your browser may send both your local and public IP addresses to an external server, allowing websites or attackers to obtain your real IP address, despite an active proxy or VPN. You can see this effect clearly by performing a “WebRTC leak test” on sites like browserleaks.com and ipleak.net.
How to Fix WebRTC Leaks:
I. Disable WebRTC in your browser:
- In Firefox: You can completely disable WebRTC by changing the value of media.peerconnection.enabled in about:config to false.
- In Chrome: You can install an extension to block WebRTC, as it cannot be disabled directly in settings.
II. Use a reliable proxy or VPN: Reputable providers can prevent DNS and WebRTC leaks. Ensure your proxy or VPN has the necessary protections.
These tests help confirm that your internet connection is secure, and you can maintain privacy when using a proxy or VPN.
WebRTC leaks are not a risk for iProxy.online users, as proxy clients do not use the direct connections typical of WebRTC. Unlike VPNs, proxies redirect only network requests and do not interact with protocols that WebRTC uses to reveal IP addresses, making IP leaks through WebRTC impossible when using a proxy.
Need private and fast mobile proxies?Make mobile proxies right now!
Solve Your Business Tasks with iProxy!
iProxy offers an innovative solution for creating private mobile proxies directly on your Android device. With the iProxy app, you can set up a mobile proxy server in minutes, providing a level of security and reliability that’s hard to find with other providers. If you work in web scraping, managing multiple social media accounts, price monitoring, automation, or other tasks, iProxy is the ideal choice.
One of iProxy’s key advantages is the ability to create mobile proxies with unlimited IP rotation. This robust solution bypasses blocks and secures your data. Your proxies will continually change IP addresses, making them perfect for working in complex internet environments. With secure proxy servers, users don’t need to worry about DNS leaks — all requests are routed through secure channels, ensuring complete anonymity.
Since 2020, the iProxy team has built a reliable technical infrastructure, ensuring stability and 99.9% uptime. You’ll also appreciate a variety of technical features, including support for multiple IP rotation mechanisms, compatibility with HTTP, SOCKS5, OpenVPN, and UDP protocols, an intuitive control panel, and Telegram integration.
Managing proxies has never been easier: the user-friendly control panel and powerful functionality allow you to set everything up to your liking, even if you have no technical skills. Create mobile proxies from your personal Android device in just 5 minutes.
If you have any questions, don’t hesitate to reach out to us on WhatsApp or Telegram. The responsive iProxy support team is always ready to assist.
Need private and fast mobile proxies?Make mobile proxies right now!
Are you ready to close this tab? But your data is ALREADY leaking! Now is the perfect time to make sure you know how to prevent it. Answer our questions below to reinforce your understanding.
- Best Mobile Proxy Providers [2026]

- How to Set Up Remote Change of IP Address Through iProxy.online?
- How to Make Money With Proxies [The Complete Guide]
- How to Increase the Proxy Speed: Detailed Guide
- Guide for setting up mobile proxies in iProxy.online
- All about .OVPN configs, UDP, HTTP/3, QUIQ support
- What is Wi-Fi Split? How does it help to increase the speed and reduce traffic consumption?
- Replace passive OS fingerprint in mobile proxies
- List of recommended phones for iProxy.online
- How to choose the right location of the server?
What is DNS and how does the DNS system work?
DNS (Domain Name System) translates domain names (e.g., "google.com") into numeric IP addresses that computers use for communication. It works as the internet's phone book, helping your device locate the websites you need.
What are the consequences of DNS leaks?
DNS leaks can lead to a loss of anonymity, personalized ads, restricted content access (especially in countries with internet censorship), and exposure of your real location.
How do I check my device for DNS leaks?
You can check for DNS leaks using online services like whoer.net, ipleak.net, or dnsleaktest.com. If the DNS server matches the IP address location provided by your VPN or proxy, the masking is working correctly, and your requests are secure. However, if the list shows DNS servers from your regular ISP, then your requests are bypassing the VPN, allowing your ISP to see your activities.
What steps can I take to prevent DNS leaks?
To prevent DNS leaks, use a proxy or VPN that supports DNS requests, change DNS servers to more private options (like Cloudflare or Google DNS), install a WebRTC-blocking extension in your browser, and configure your firewall to block unsecured DNS requests.
What proxy service can I use to create my own mobile proxies on Android and protect against DNS leaks?
iProxy.online allows you to create private mobile proxies on Android, ensuring security and preventing DNS leaks with reliable servers and advanced technology.
- Best Mobile Proxy Providers [2026]
- How to Set Up Remote Change of IP Address Through iProxy.online?
- How to Make Money With Proxies [The Complete Guide]
- How to Increase the Proxy Speed: Detailed Guide
- Guide for setting up mobile proxies in iProxy.online
- All about .OVPN configs, UDP, HTTP/3, QUIQ support
- What is Wi-Fi Split? How does it help to increase the speed and reduce traffic consumption?
- Replace passive OS fingerprint in mobile proxies
- List of recommended phones for iProxy.online
- How to choose the right location of the server?