What is Dolphin{anty}?
Dolphin{anty} is an anti-detect browser that masks browser fingerprints to enable secure multi-account management and prevent tracking. It’s widely used by affiliate marketers, crypto traders, and professionals who need multiple online identities without detection. Top teams from Coinlist and Huobi already trust this browser. Learn more in our detailed review .
Key Features of Dolphin{anty}
Dolphin {anty} changes many parameters of the fingerprint including WebRTC, Canvas, WebGL, Client Rects, Time Zone, Language, GEO, CPU, Memory, Screen, Media, Ports, and so on.
Also, there’s a cookie robot that fulfills cookies for you, so that you don’t have to go around websites to get a history of “proper” activities.
The anti-detect easily passes the checks of different digital fingerprint scanners, including Pixelscan and CreepJS.
When creating Dolphin{anty}, the developers focused not only on reliability, but also on usability. When using this anti-detect browser, you can:
- Manage tags for your accounts.
- Add browser extensions to all profiles at once using a link from the store. For example, you can install translating extension to hundreds of profiles at once with a couple of clicks.
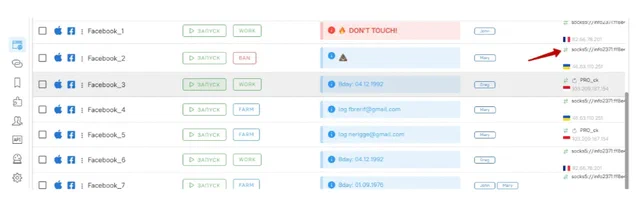
- Add statuses to profiles. Make it easier to find the needed accounts: which one is getting farmed, which is active, which runs ads, and which is banned.
- Add notes to all profiles. For example, you can add account information, login, password, etc.
- Save as much proxies as you have browser profiles.
- Update IP addresses of the mobile proxies from the browsers interface.
- Copy profiles with randomized digital fingerprints. In a couple of clicks, you can create a duplicate of an existing profile, only with a unique fingerprint.
- Customize start pages. When you run your profiles, the tabs you want will automatically open.
This method of managing multiple profiles allows you to regularly maintain and automate the management of dozens or even hundreds of profiles without manual hassle. Dolphin{anty} has quite loyal rates. Moreover, after the trial ends, all users have 10 profiles available for free.
Why use iProxy with Dolphin{anty}?
Using proxy proxy dolphin anty setups with iProxy provides key advantages:
-
iProxy provides reliable mobile proxy for Dolphin anty with IP addresses tied to the physical location of the SIM card, ensuring genuine and stable geo-specific connections. See what is mobile proxy for details.
-
This location binding helps avoid blocks and improves trustworthiness when managing multiple accounts in Dolphin{anty}.
-
Mobile proxies from iProxy reduce the risk of captchas and detection compared to datacenter proxies. -iProxy covers a wide range of regions, allowing you to select proxies that match your target location needs precisely. For reliable options, check out our trusted mobile proxy providers .
-
Seamless Dolphin anty proxy integration and responsive support make it easy to automate your proxy usage and maintain a regular rotation for better security and efficiency.
How to set up proxies in Dolphin{anty}
Wondering how to add proxy to Dolphin anty? Follow these steps:
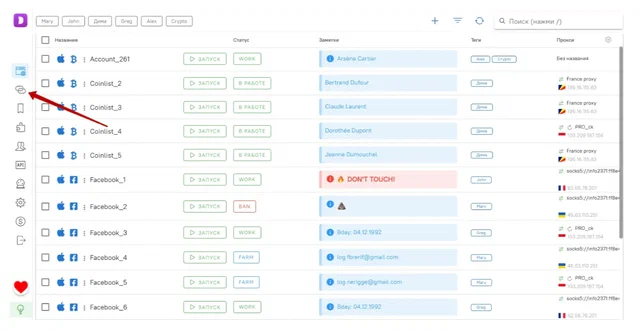
Click on the appropriate icon in the sidebar:
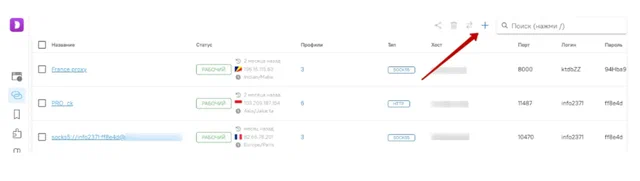
Click the plus sign in the upper right corner:
In the opened window, insert the proxy in the block. If you want to add several proxies at once, write them in a column. When you are ready, click “Add”:
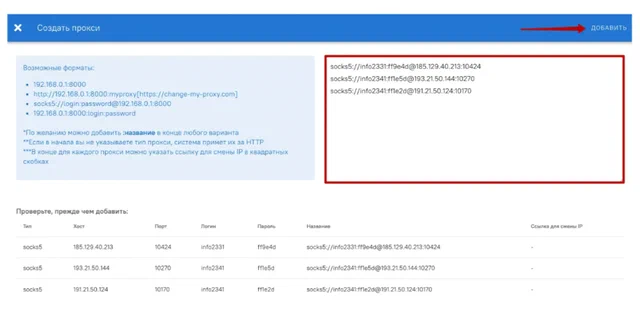
If you are using mobile proxies, add a link for changing IP in the “Change IP URL” box. Your mobile proxy entry will look like this: socks5://info2331:[email protected]:10424[https://iproxy.online/api-rt/changeip/PfMlxTEqDd/x6R35PPATHP92HMYFT52G].
To check that all proxies work correctly, tick the checkboxes to the left of the added proxies and click on the button to test the connection:
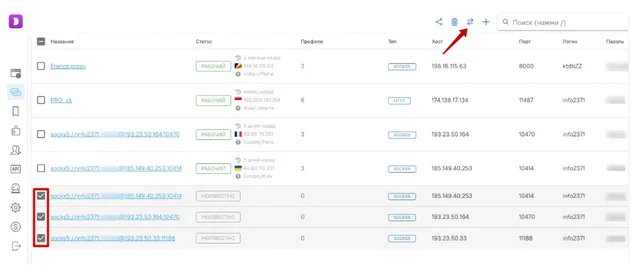
If the proxies are working correctly, they will have a “Working” status. To change the mobile proxy IP, just click this icon on the main profile screen:
 That’s all, these simple steps complete the proxy setup. That’s how you can add and save an unlimited number of proxies and use them for your profit.
How to work in multiple Facebook accounts using 1 proxy
For more specialized needs, you can also buy social media proxies , buy proxy for ecommerce or mobile proxies for web scraping . These options ensure you have the right tools for any task.